
.jpeg)

Updated 7/18/2025 by William Boggs
Resources
Definitions
Tag: what you want to track
Trigger: when you want to track it
Snake case: all lowercase words, separated using underscores (ex: snake_case).
Fire: a term used to describe when a Tag becomes active (ie: the Tag had a Phone Link Click trigger, so when someone clicked the Phone Link, the Tag fired).
Links
YouTube: Google Tag Manager Tutorial for Beginners (2023)
YouTube: Track Phone Number Clicks with Google Tag Manager and Google Analytics 4
List of GA4 Recommended Events
Track calls to a phone number on a website
Diagnostics and Debugging
GA4 DebugView
- To access the DebugView, go to GA4 > Admin > DebugView.
- Here, you can see events as they are fired, and the device on which they are fired. You can use this to confirm that events are being sent.
DebugView Tips
Here you can see things like page_location, which shows the page URL where an event happened.
You may also be able to find similar information in the Tag Assistant, but DebugView will prove whether the information is also being pushed to GA4. You must have a GA4 Configuration Tag set up for this to function.
Google Tag Assistant
- In Google Tag Manager, once you have an active tag, click Preview in the top right of the Workspace tab. Add the URL and click Connect. This will open the site in a new tab. Back in GTM, you will see a success message if the site is connected. Click continue.
- From here, you can see all Events that happen on the site, as well as Variables within that Event.
Note: Be sure you're looking at the correct Event. For example: Tags set to fire on Container Loaded will not appear as fired in the Window Loaded event. This is because the Tag is fired on Container Loaded, rather than on Window Loaded.- Click on an Event to see what Tags were fired with it. For example, Container Loaded may show your GA4 Configuration tag.
- Click on a Tag within an Event to view additional information, including Firing Triggers (this can be helpful when determining how to set up a new Conversion tag.
Troubleshooting Tag Assistant
Event is not appearing in GA4
- In GTM, check the version history to see if the container was published. If not, return to the Workspace and click Submit.
- In GTM, make sure the Measurement ID is correct in the GA4 Configuration Tag.
Tag is not firing
- Double-check the tag’s setup. Common mistakes include the following.
- Typo in the Trigger firing conditions or incorrect condition selected (ex: Click URL vs Page URL).
Events show in GA4 but no tags appear in GTM
There is likely a syncing issue.
- Check the version history by going to Versions and clicking on the latest version. You should see all relevant Tags, Triggers, etc. in this view. If you do, proceed to step 2. If not, you may still need to set it up.
- If everything needed shows up in the latest Version, click the 3 dots to the right of the Version row and click Publish.
- You should see a popup asking if you want to update your Workspace. Click this and update your Workspace.
- You should now see the most recent version in your Workspace.
Alternatively, try this:
- Try re-importing the container from the .json file, then publish.
- You may see an error stating that the Container is out-of-date. You may also get an error saying that these Tags/Triggers/Variables already existAND/OR you may see a button to Re-Sync the data.
- Update and/or re-sync.
- If you still see the error that these Tags/Triggers/Variables already exist, delete all existing Triggers, Tags, and User-Defined Variables. You may want to take a screenshot before deleting if there are any that you are unfamiliar with.
- Update or re-sync again. This should resolve the problem. Be sure to Publish changes.
- Double-check that all Tags, Triggers, and Variables are correct and are using the correct Measurement ID. If you need to make any changes, be sure to Publish again.
How to find your GA4 Measurement ID
- Log into GA4 and select an account.
- Click on Admin (gear icon in the lower left corner).
- In the second column, select Data Streams, then select the appropriate Data Stream.
- Find your Measurement ID.
Types of Events
There are 4 types of Events:
- Automatically Tracked Events
- Enhanced Measurement (auto tracking)
- Recommended Events
- Custom Events: List of GA4 Recommended Events
Automatically Tracked Events
- first_session: tracked if a visitor lands on your website for the first time ever
- session_start: the start of a new browsing session
- user_engagement: when a user is engaged with your page (ex. User views more than 2 pages, etc.)
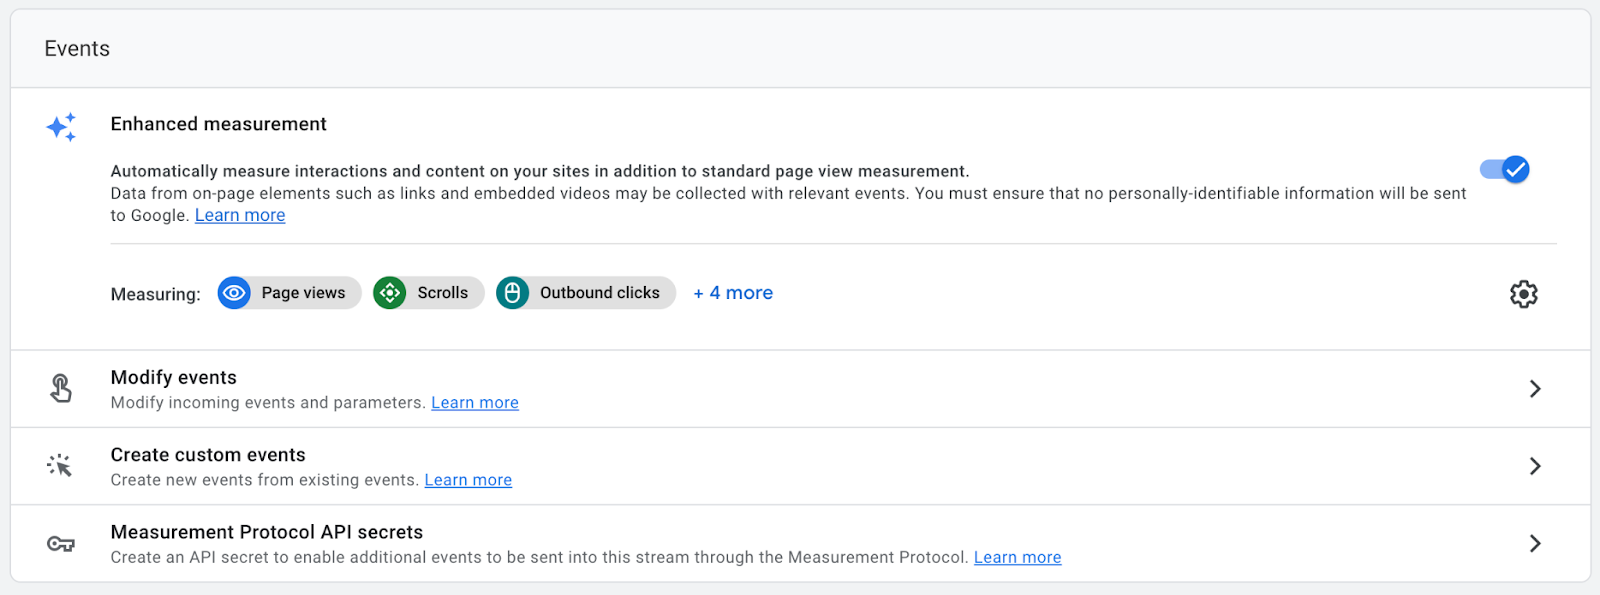
Enhanced Measurement
View additional documentation from Google’s Help Center here.
- These are added when you enable Enhanced measurement in Admin > Data Stream > Select data steam > Enhanced measurement. You can toggle which events this will measure by clicking the gear icon.
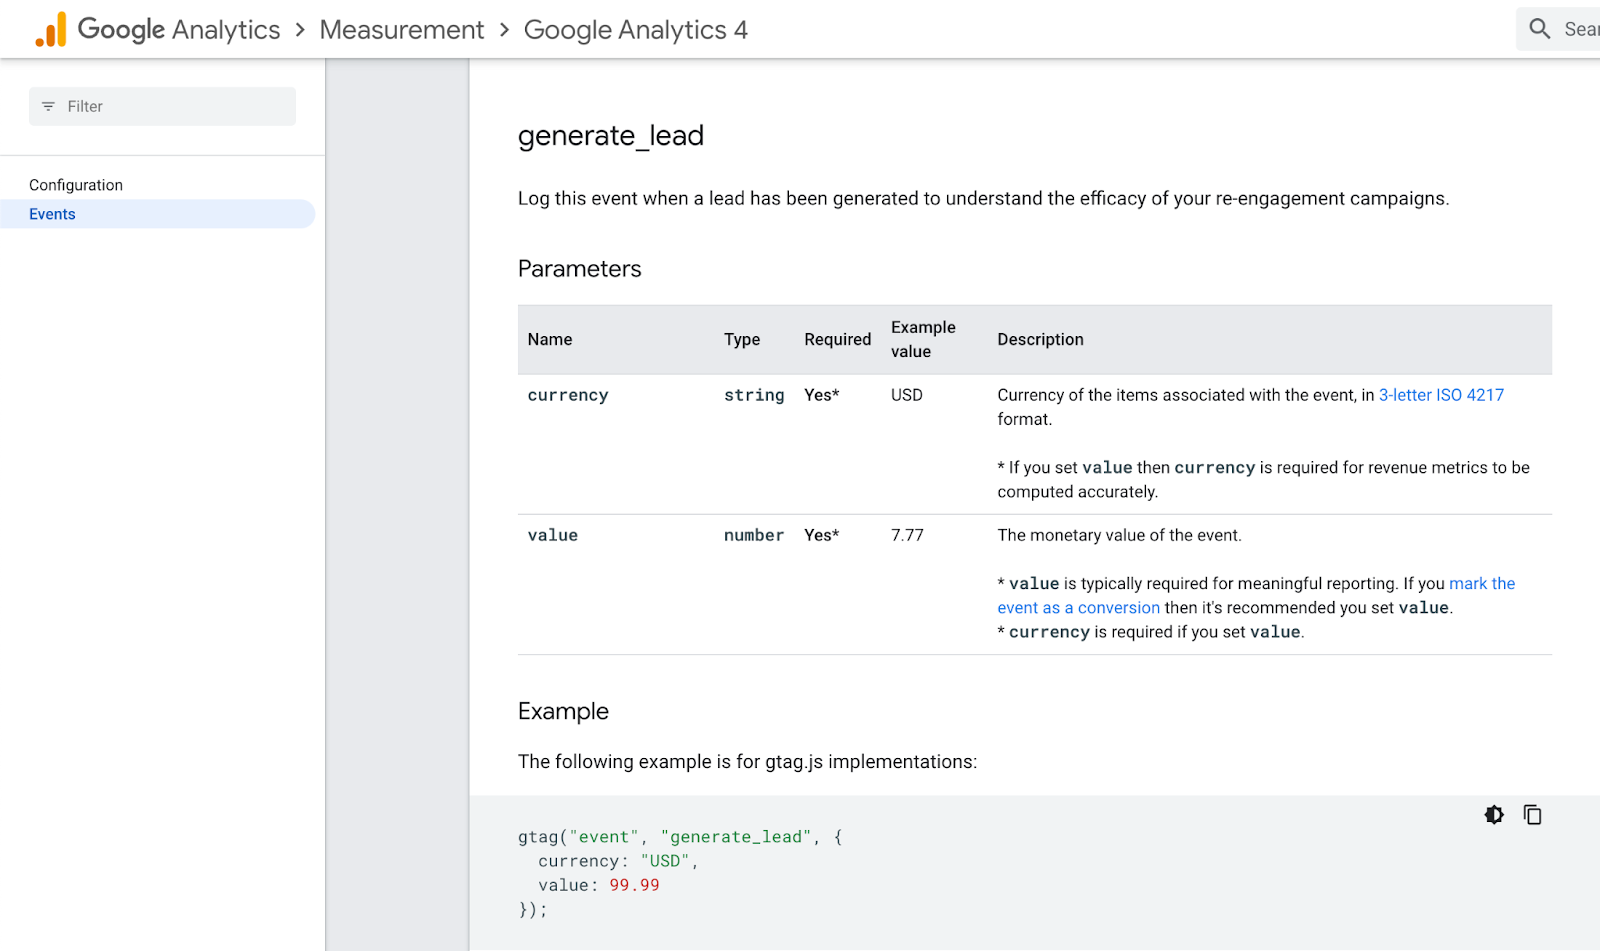
Recommended Events
List of GA4 Recommended Events
You can click the link on any Recommended Event to be redirected to developer documentation, which outlines the event parameters and HTML. See the screenshot below:
Custom Events
It is suggested that you use Recommended Events, but if none of those work you can use Custom Events.
It is recommended that you use snake case when creating Custom Events.
How to set up GA4 (Google Analytics 4)
- Go to analytics.google.com
- Create a GA4 Property
Marking Key Events (aka conversion actions)
- In GA4, go to Admin > Events (located under the Property column).
- Mark the Events you added using GTM as Key Events, as applicable.
How to set up Google Tag Manager (GMT)
- Go to tagmanager.google.com
- Create a New Account and name the Account.
- Name the container. Recommendation: use the domain name.
- Set the Target platform. For websites, use Web.
- Click Create and agree to the terms of service.
- You will be given 2 code snippets. Depending on your platform, you may have installation options:
- You can paste these code snippets into the website manually. If you are not yet ready to add the code snippets to your website, you can find them again later by going to GTM > Admin > Install Google Tag Manager.
- If you use a plugin to connect GTM to your website, you may be able to simply input the GTM tracking code (GTM-XXXXXXX) into the pugin.
- Tip: If you are setting up multiple similar websites, in your GTM dashboard, you can go to Admin > Export to export the container and import it to other similar sites. Be sure to update the Measurement ID in your GA4 Configuration Tag. Updating here will update the connected GA4 Configuration Tag for all connected Tags in the container.
Unique identifiers such as accountID, containerID, and publicID will all be updated automatically upon import.
Steps to set up GTM
When following the steps below in Triggers and Tags, proceed in this order:
- Create a GA4 Configuration Tag. Most accounts will only require one GA4 Configuration Tag, which will connect Tags and Triggers to GA4 during their respective setups. Because a GA4 Configuration Tag is needed to create a Trigger, this step should be done prior to creating a Trigger.
- Create a Trigger. You can create as many or as few Triggers as you need. One trigger can be used in multiple Tags, so you do not need separate Triggers for each Tag. These Triggers define when your Tags should fire. Because a Trigger is needed to create a Tag, this step should be done prior to creating a Tag.
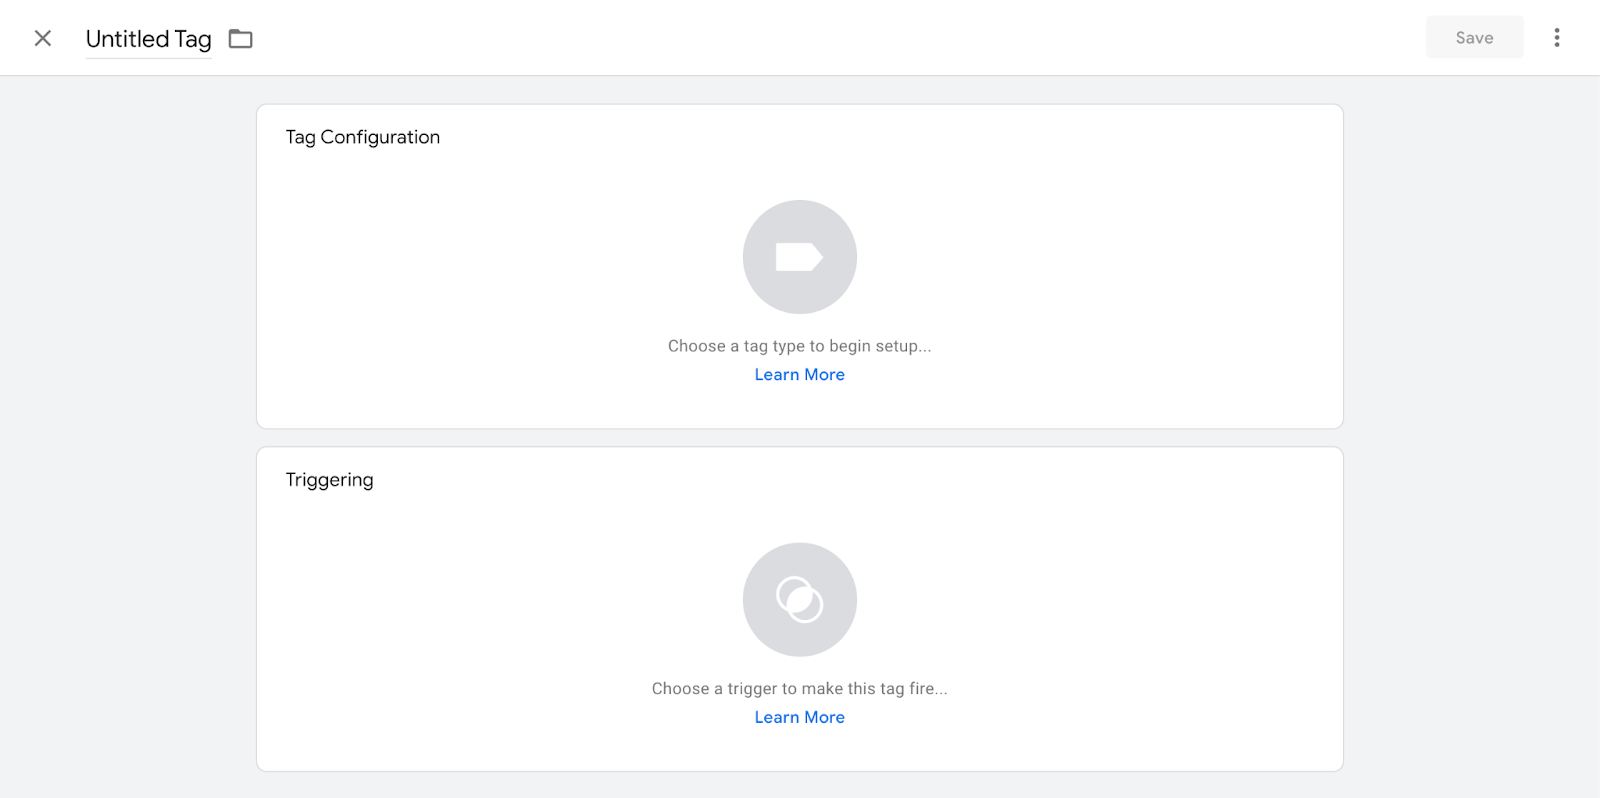
- Create a Tag. You can create as many or as few Tags as you need. Note: the Event Name as defined in the Tag will be the name of the Event in both GA4 and Google Ads if these are used. It is suggested to use snake case in the naming convention for Tag Event Names. Be sure to include the following:
- Conversion Linker Tag
- Other common Tags may include: Tel Link Click, Thank You Page View
- Be sure to mark any conversion events as conversions in GA4.
- Import the GA4 events into Google Ads as applicable.
GTM Triggers
Link Click Triggers
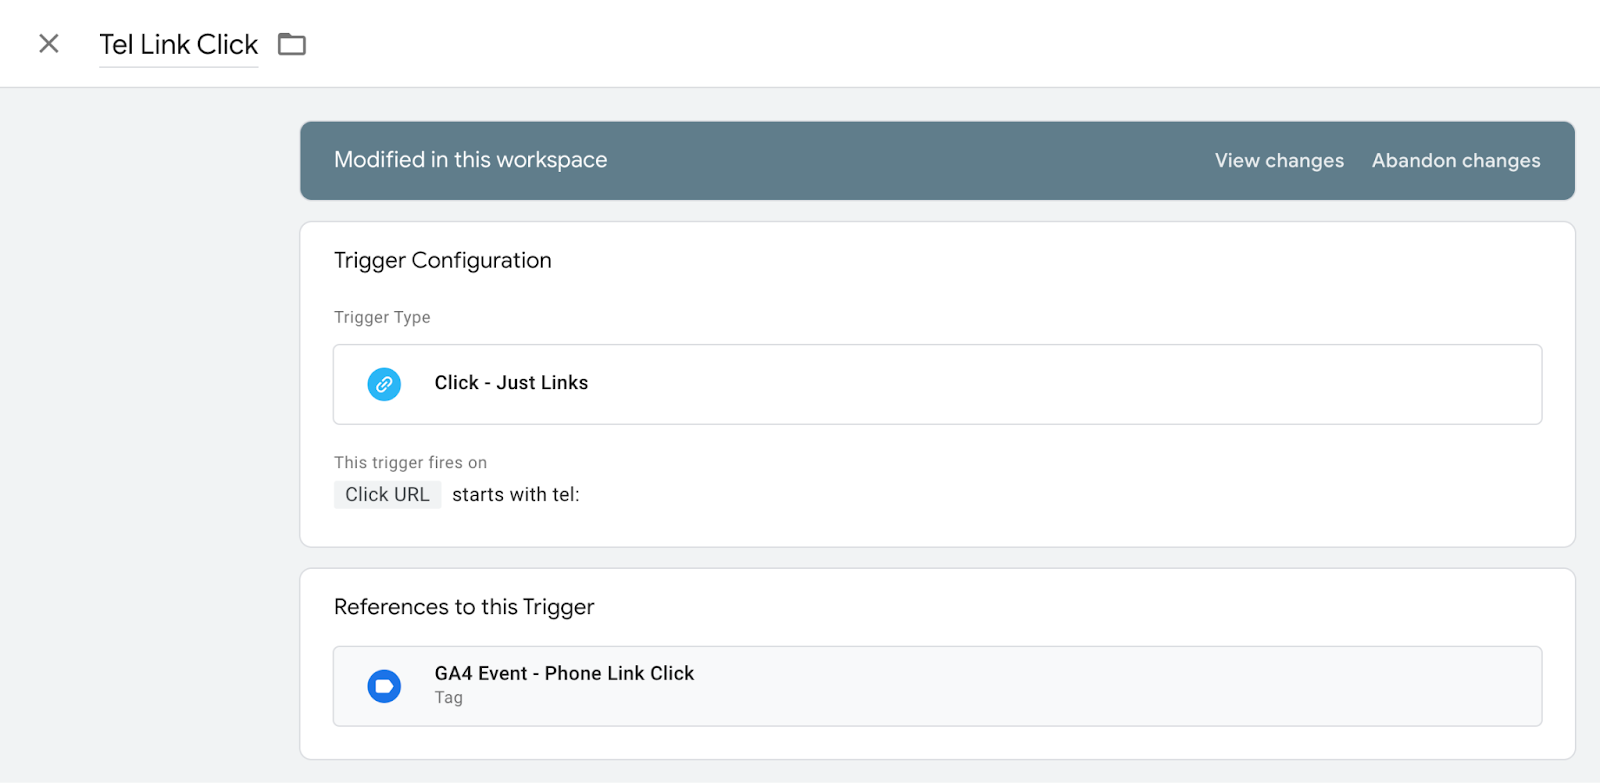
"Tel:" Link Click Trigger
Watch this helpful video for a visual walkthrough.
TIP: You can use Tag Assistant to view Event Variables for more specific information.
- First, make sure Click Variables are enabled: GTM > Variables > Configure > Check all variables under Clicks.
- Triggers > New
- Name the Trigger. Recommendation: Tel Link Click.
- Click Trigger Configuration > Under the Click section, select Just Links.
- Set “This trigger fires on” to Some Link Clicks
- Fire this trigger when an Event occurs and all of these conditions are true
- Click URL > Starts with > type “tel:” without the quotes
- Save
Page View Triggers
- Can be set to All Page Views or Some Page Views
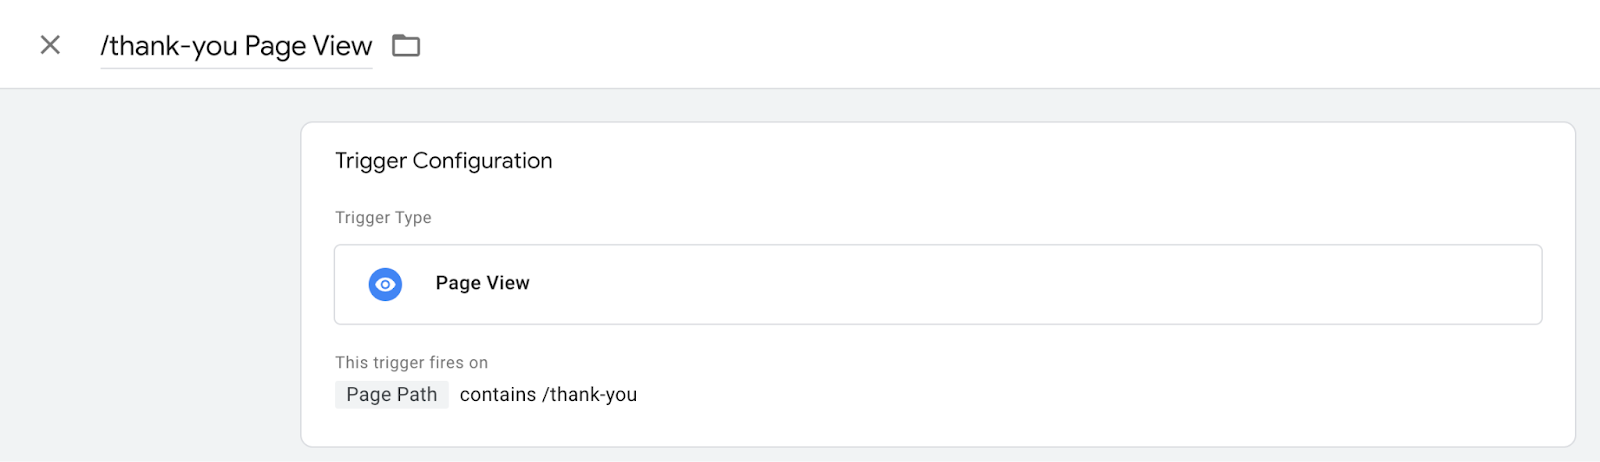
"/thank-you" Page Triggers
- Create and name the Trigger. Recommendation: /thank-you Page View
- Select Page View for the Trigger Type and select Some Page Views
- Use either Page Path or Page URL in your Trigger configuration
Custom Event Triggers
- Enable any potentially useful Variables (ex: Click variables). Note: these are different from the Variables defined in this page. These Variables can be used to debug the Event and determine the best Variable to use for the Trigger.
- Name the Trigger in such a way that its function can be distinguished.
- Select Custom Event for the Trigger Type.
- For Event name, choose the name of the event found in the GTM Preview or Debugger next to _event.
- Depending on the scenario, you may either name it as you please or you may be required to use an Event Name defined in a “push” or “postMessage” function (this typically applies to iframe triggers).
- For default events, such as form_submit, you may use a Custom Event with the Event Name as “form_submit” set to trigger on All Events. No filter is necessary.
- Once you have determined an appropriate variable to define the Event, select Some Custom Events and input applicable conditions.
How to set up GTM Tags
Note: the Event Name as defined in the Tag will be the name of the Event in both GA4 and Google Ads if these are used.
Anytime you edit or add Tag, you will need to Preview the Container to ensure it is working properly and once you have confirmed this, you will need to Submit the changes. Upon submission, you will be asked to name the updated Version and give it a Description. This is a great way to keep track of change history, and also allows you to roll back to previous versions if something breaks.
Note: It is not recommended to preview Form Submission Tags where the Trigger is a submission button, as this will cause a Form to submit. Instead, you should use the Tag Assistant on a test/debugging site that does not push form submissions to the business, and find a common variable to use. Once the Tag is set up on the live site, you can follow up at a later date to ensure it is working.
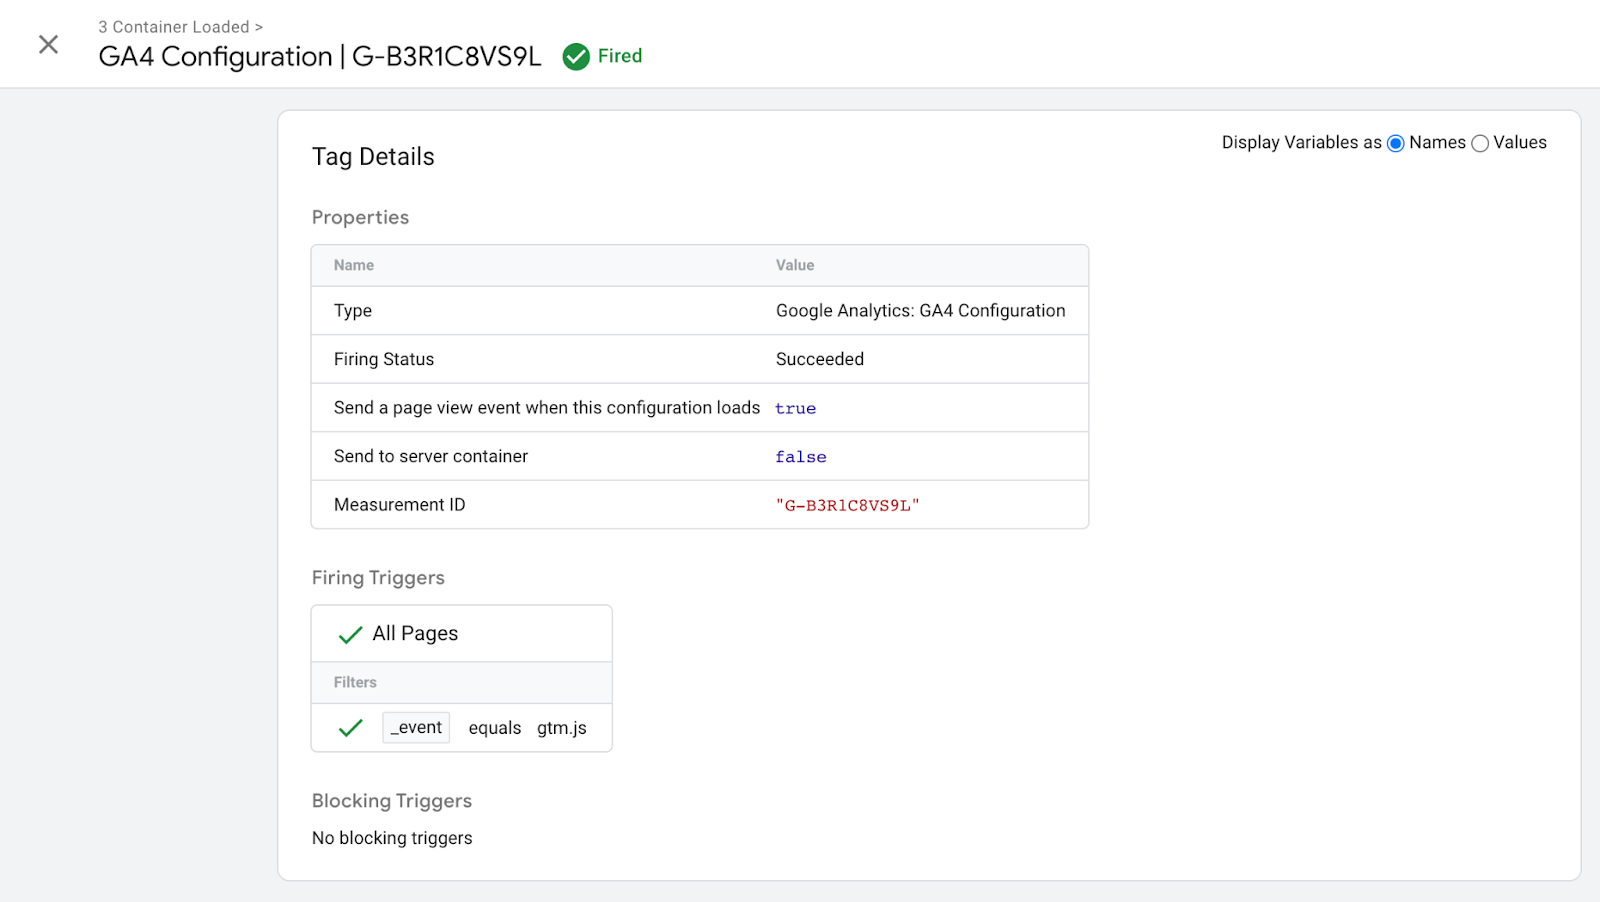
GA4 Configuration Tag
- Go to GTM > Tags > New. You will then see this
- (Recommendation) Name the tag in the following convention: "GA4 Configuration - G-XXXXXXXXXX". Use the property’s Measurement ID, found in GA4, in place of the G-XXXXXXXXXX.
- Click Tag Configuration > Google Analytics: GA4 Configuration > Paste the Measurement ID from GA4 into the Measurement ID box. Alternatively, instead of pasting the measurement ID, you can use a Variable.
- Click Triggering > Select the trigger where Name = All Pages and Type = Pageview

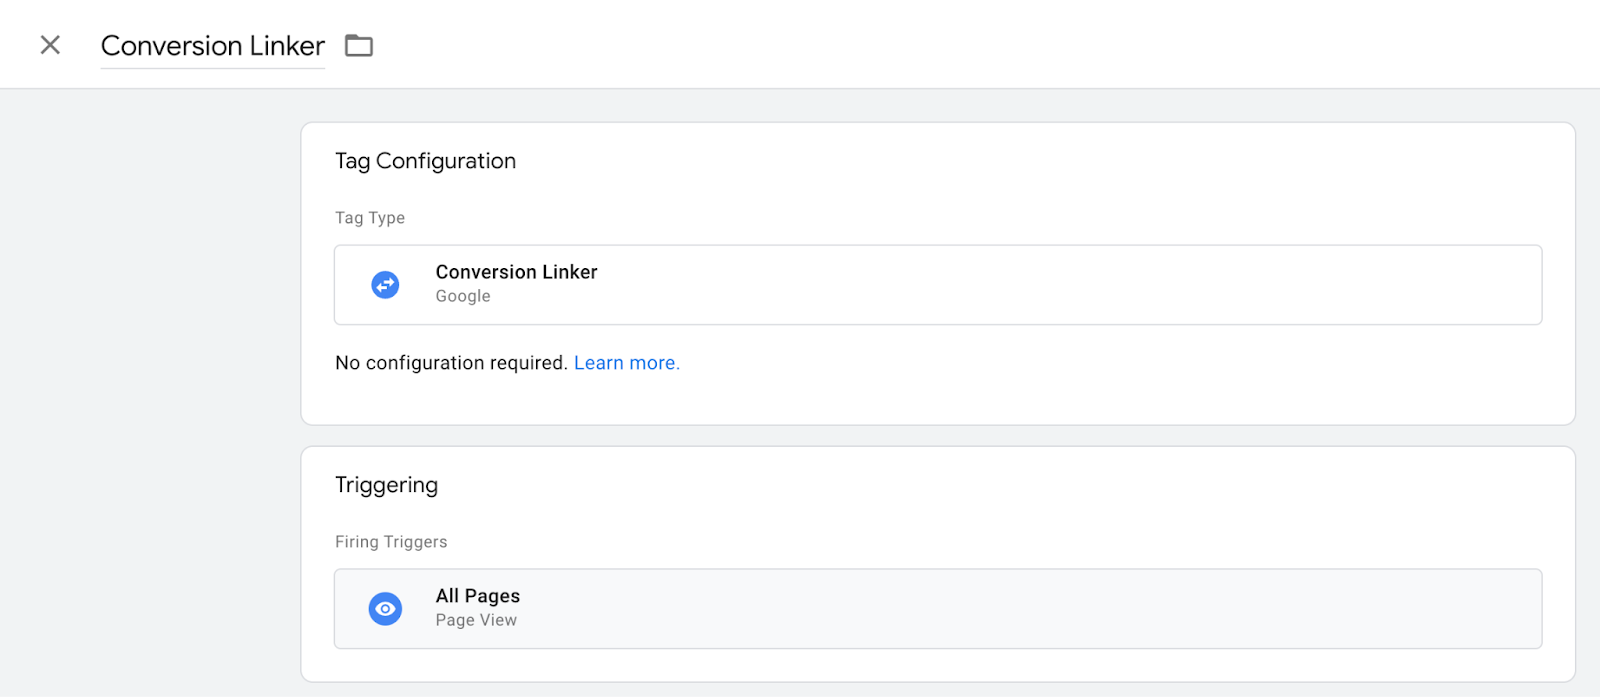
Conversion Linker Tag
View Google’s Help page on this topic for additional information.
- Click Tags and then New.
- Click Tag Configuration and select Conversion Linker. No additional configuration should be required (view Google’s Help page for more information).
- Select a trigger. In most cases, you should use the All Page Views trigger, or on specific page views where site visitors will land after an ad is clicked.
- Save and publish your tag configuration.
Custom HTML (CHTML) Tag
Tag naming convention recommendation: cHTML - [Name of tool]
Use these tags to add custom HTML to your site.
These types of tags can also be used to add JavaScript to a website.
If you want to add a tag to all pages, in the Triggering section, select All Pages.
Elementor Form Listener
Elementor is a pagebuilder WordPress Plugin. It uses AJAX, so some events are not detected by GTM. Here’s how to fix this:
- Create a Custom HTML Tag: "cHTML - Elementor Listener submit_success - form_submit".
- Use this code:
<!-- This script listens for the submit_success event in Elementor and triggers a form_submit event-->
<script>
jQuery(document).ready(function($) {  jQuery(document).on('submit_success', function(event) {    dataLayer.push({      event: 'form_submit',      form_name: 'elementor_generic',      form_target: event.target.action || 'unknown'    });  });});
</script>- You may replace form_submit with any other name you choose for your form submission event.
iFrame Tags
Note: An iframe essentially is another child website embedded within a parent website. Setting up an iframe Tag may require a separate Container and Tag to be set up on the iframe source (parent) site.
Note: A Custom Event Trigger may be required.
Google Analytics: GA4 Event Tag
- Select the GA4 Configuration Tag
- Name the event using snake case.
- Optional: Add parameters. Use this Help article as reference.
- Name the Parameter whatever you like, using snake case.
- Use {{Curly Brackets}} to define Values from Variables
GA4 Event: Page View Tag
- Create a New Tag > Google Analytics: GA4 Event Tag.
- Name the Tag. Recommendation: GA4 Event - Thank You Page View
- Name the Event inside the Tag using snake case. Recommendation: ga4_event_thank_you_page_view
- Add a Trigger as appropriate. For example, if you are using this tag to record views on a /thank-you page, you would use a Thank You Page View Trigger.
GA4 Event: Tel Link Click Tag
- First, make sure Click Variables are enabled: GTM > Variables > Configure > Check all variables under Clicks.
- Create a New Tag > Google Analytics: GA4 Event Tag.
- Name the Tag. Recommendation: GA4 Event - Phone Link Click.
- Name the Event inside the Tag. Recommendation: ga4_event_phone_link_click.
- Add a Parameter where Parameter Name = link_url and Value = {{Click URL}}. This will enable you to see the phone number in Tag Assistant or the Debug tool if needed.
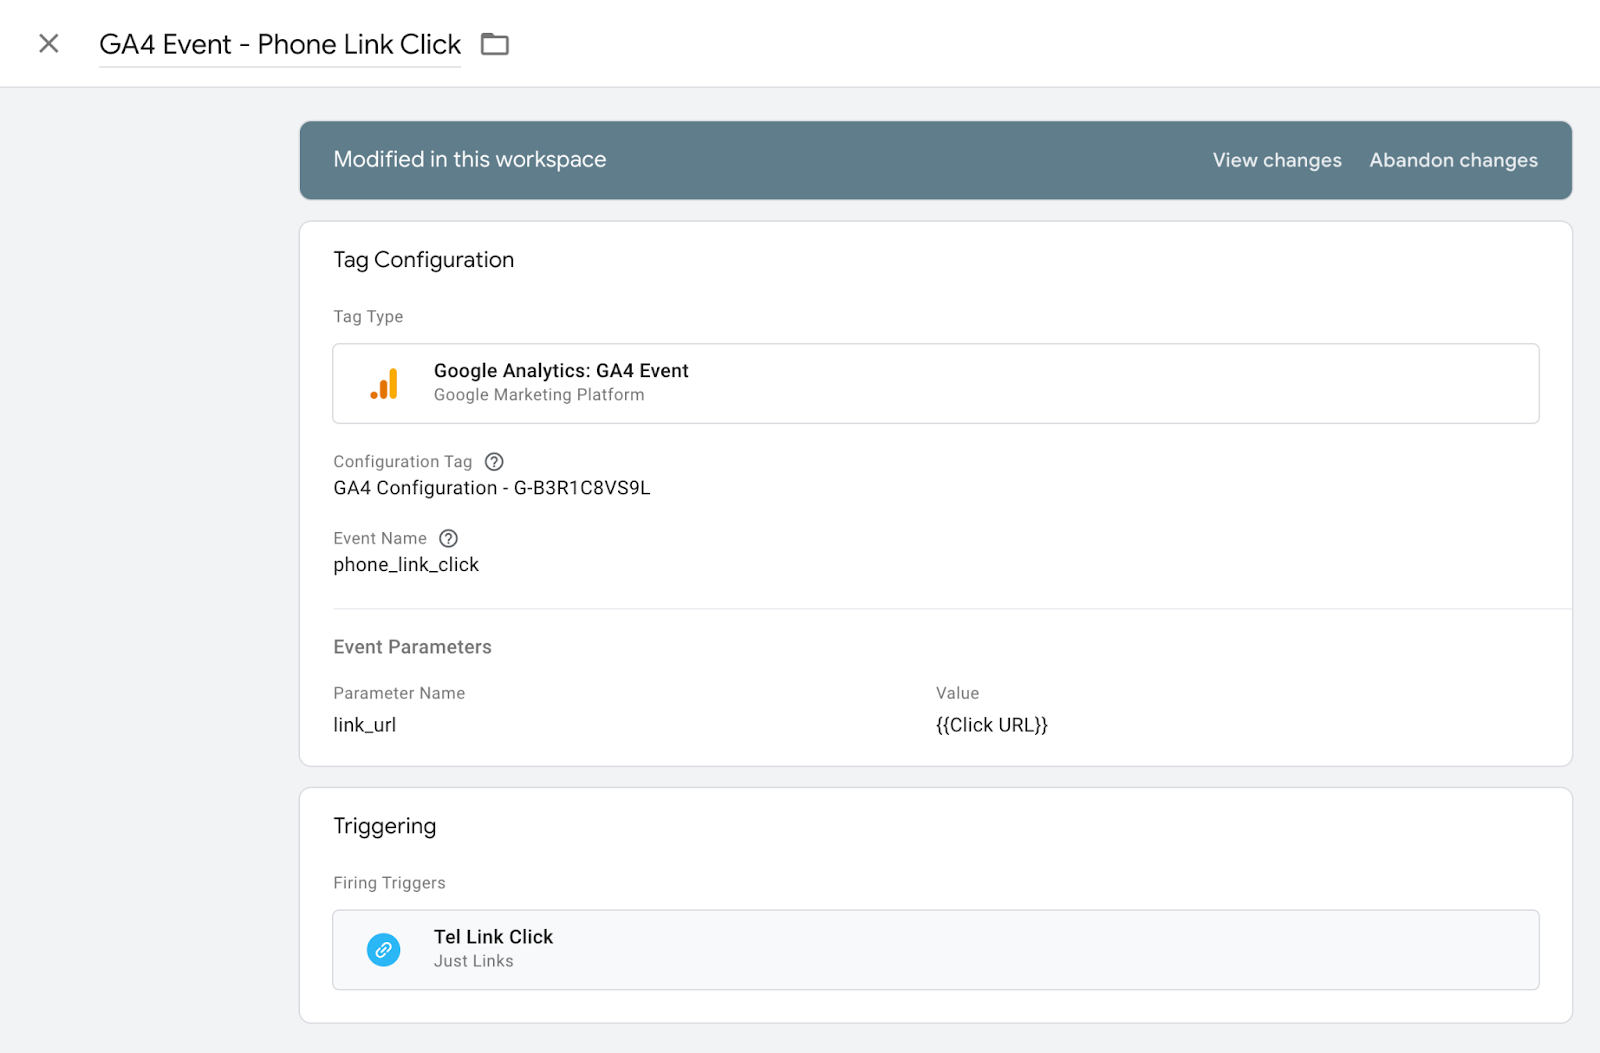
- For a Trigger, select the Tel Link Click Trigger that you created.
- Save the Trigger.
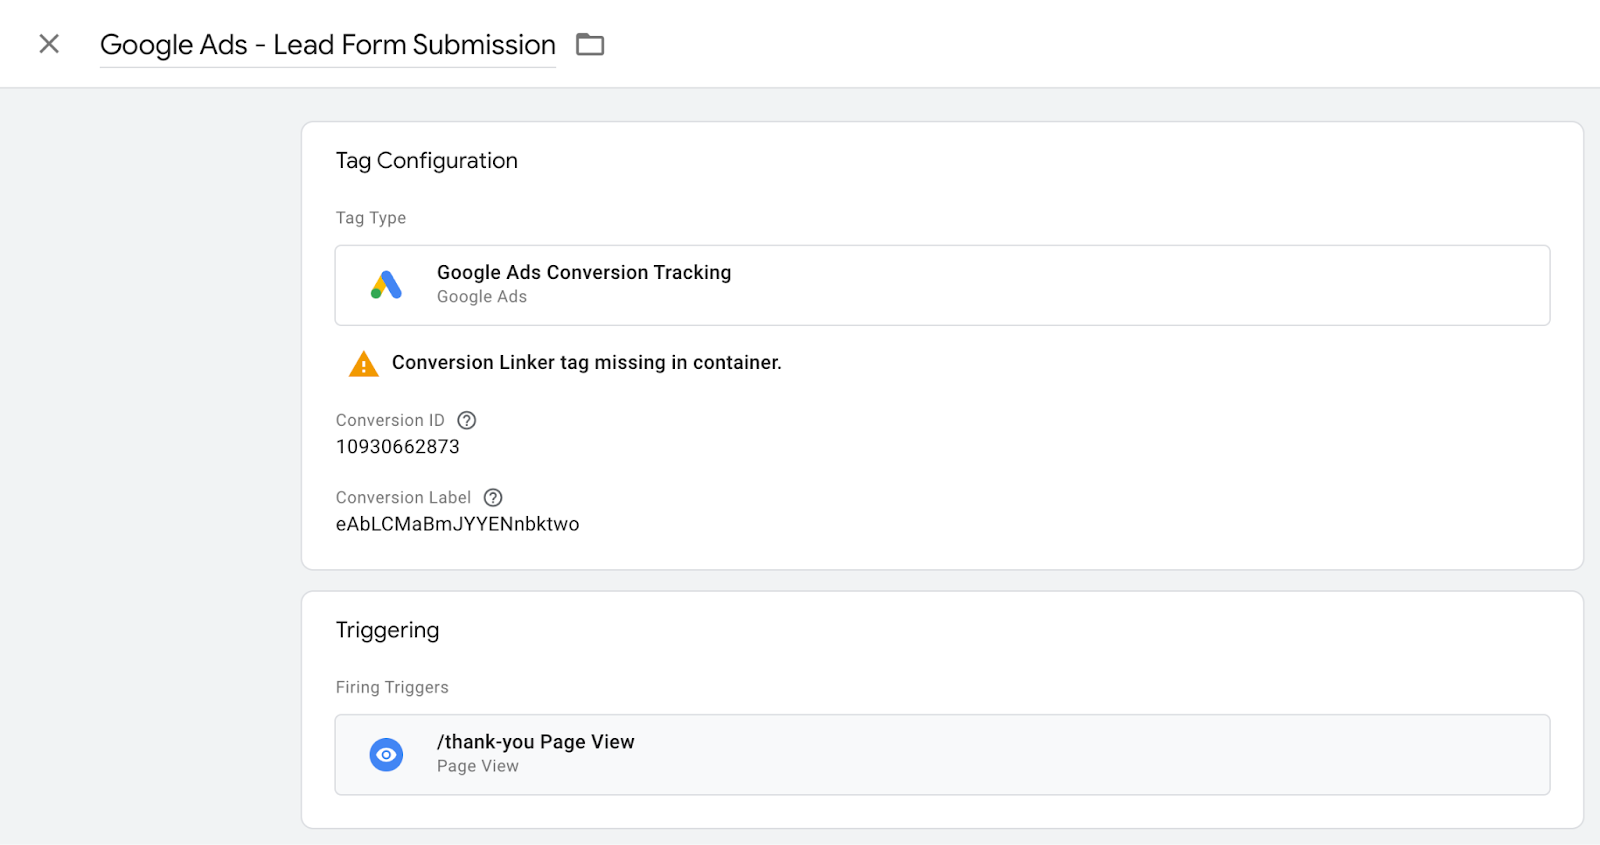
Google Ads Conversion Tracking Tag
Note: You do not need to use this tag if you are already using a GA4 Event Tag.
- Google Ads > Tools and settings > Conversions > New conversion action > Website > Create manually > Name it > Use Google Tag Manager. The codes provided under Conversion ID and Conversion Label will be used in the next step.
- Tags > New > Tag Configuration > Google Ads Conversion Tracking. Here, you will input information provided from Google Ads.
- Triggering > Use the appropriate trigger (ex: For a form submission, you may choose to use the /thank-you page trigger)
Google Ads Calls From Website Conversion Tag
Note: You do not need to use this tag if you are already using a call tracking service (such as CallRail or WhatConverts) that reports conversions to Google Ads and Analytics.
Track calls to a phone number on a website
- In Google Ads > Tools and settings > Conversions > New conversion action > Phone Calls > Calls to a phone number on your website > Continue
- Name the conversion action. Recommendation: Google Ads Calls From Website Conversion
- Set a value
- Set a count. Recommend: One
- Add the destination phone number. This is the phone number callers should reach when they call from your website.
- Enter the Display Number. This is the phone number people see currently on your website and that should be replaced by a Google Forwarding Number (GFN). Be sure to enter it exactly as it appears on the site.
- Create and continue. This will provide the Conversion ID and Conversion Label to be used in GTM in the remaining steps below.
- Open GTM and create a New Tag; select Google Ads Calls From Website Conversion.
- Name the Tag. Recommendation: Google Ads Calls From Website Conversion.
- Enter the displayed phone number to replace. This is the phone number people see currently on your website and that should be replaced by a Google Forwarding Number (GFN). Be sure to enter it exactly as it appears on the site.
- Enter the Conversion ID and Conversion Label that were provided in Google Ads.
- Click Triggering and select your tel: link clicks trigger.
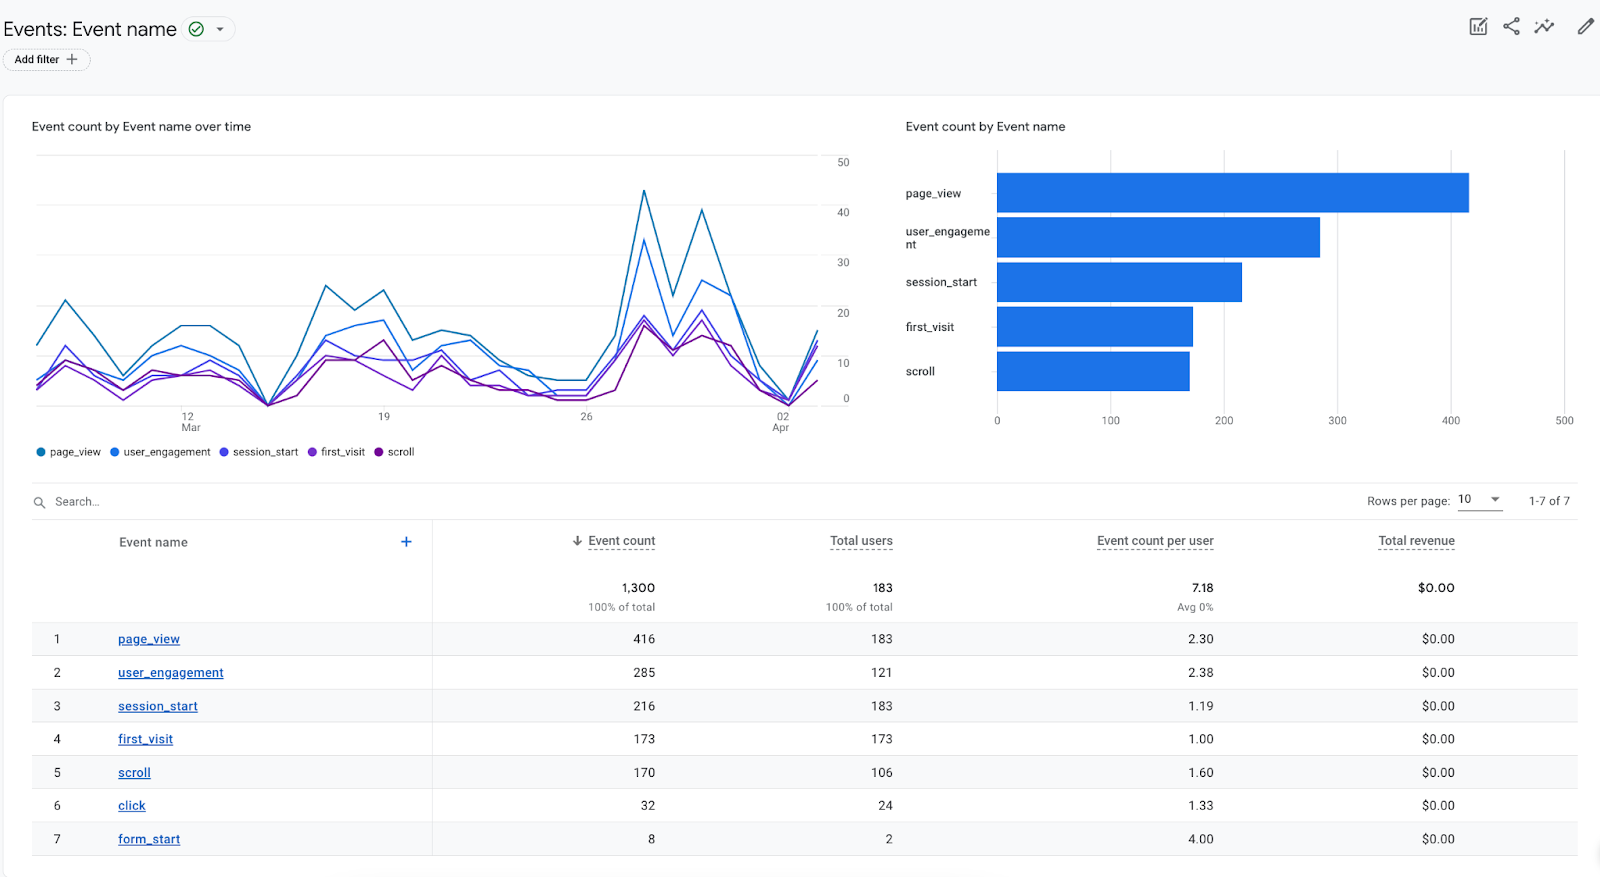
- Event information will be available in GA4 > Reports > Engagement > Events
How to set up Meta Pixel Events and Custom Conversions in GTM
When setting up the Meta Pixel, there are 2 options: Events and Custom Conversions. Events track events on your website, but cannot be used as a Campaign objective in advertising. Custom Conversions also track events, but can be used as a campaign objective in advertising.
How to set up Meta Events
- Create a new tag. For Tag Configuration, you may have to select “Discover more tag types in the Community Template Gallery” to find the Facebook Pixel tag by facebookarchive.
- Enter the Facebook Pixel ID or use a Variable.
- Either select a Standard Event or create a Custom Event and name it.
- Select a trigger for the Pixel to fire.
- Don’t forget to name your Pixel.
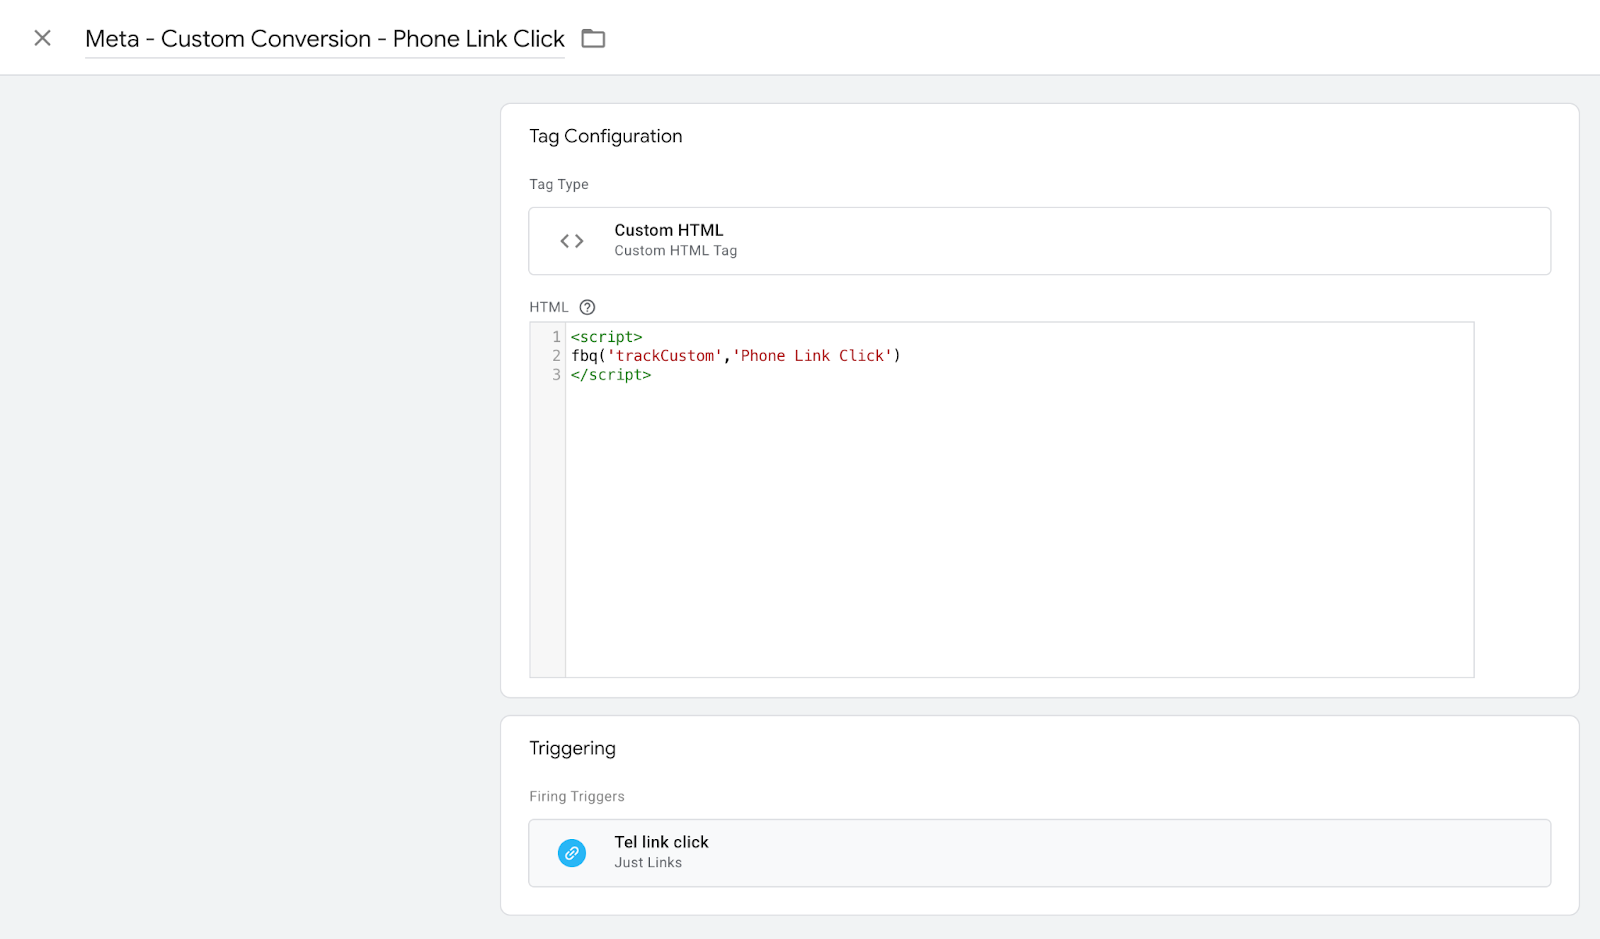
How to set up Meta Custom Conversions
- Create a Custom HTML Tag
- Copy/paste the code snippet from below and replace Custom Event Name Goes Here with the name you want your event to have.
- Select a Trigger.
1<script>
2fbq('trackCustom','Custom Event Name Goes Here')
3</script>
Example:
How to set up Variables in Google Tag Manager (GTM)
Constant Variables
Constant Variables allow you to set the value to the string you provide. These can be used as dynamic references when you need to insert something like a Pixel in multiple places or custom tags, saving you from having to look them up each time.
Google Analytics Measurement ID Variable
Insert your GA Measurement ID as the Value.
Facebook Pixel / Meta Pixel Variable
Insert your Meta Pixel as the Value.
Data Layer Variables
Data Layer Push
If you have a Data Layer Value that does not show up, these may be useful.
In my example, the form had a form_id showing in the Data Layers in the GTM Preview/Debugger but the Form ID field in the Variables tab was not showing.
- Variable name: DLV - Form ID
- Variable Type : Data Layer Variable
- Data Layer Variable Name: eventModel.form_id
This tells GTM to “Go to the eventModel folder, then grab the form_id inside it.” Now, instead of using the form_id default variable as your target, you can use the {{DLV - Form ID}} variable as a proxy.
Frequently Asked Questions
- In the GTM Previewer, my _event and Event names are not the same. How can I fix this?
- Refer to Data Layer Push.